
3 Quick and Dirty Steps to Better Product Photos [INFOGRAPHIC]
In the world of ecommerce, imagery can truly make or break a sale. So having nice, clear and ‘professional looking’ product shots can really improve your website conversions.
For someone starting up in ecommerce – this doesn’t mean you have to spend thousands of dollars on a professional photographer or costly equipment. You’d be amazed at what you can do with a simple (and outdated) smartphone camera!
Embed this infographic on your website - copy and paste the code below:
*A note on using Supplier photos. Most manufacturers and suppliers will have product shots available for you to use for your ecommerce store. One thing to keep in mind is that these shots will often be used by multiple sites across the web. If you want your images to stand out amongst the riff-raff, it’s worth considering your own photo shoot.*
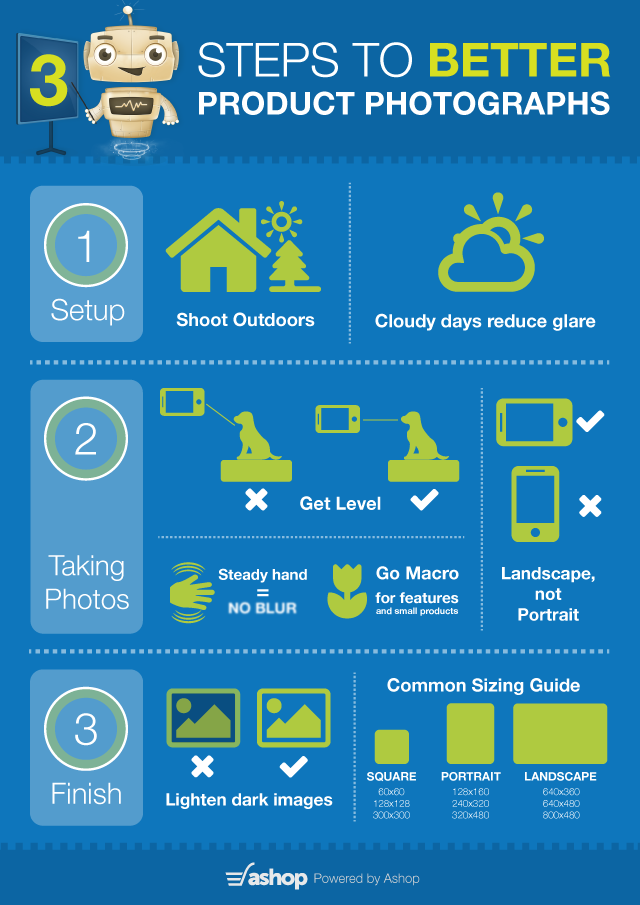
2. Get on the level. The temptation is to just take the photo while standing but this probably not the best angle for your photos. So make sure you’re as eye level as possible with your product for at least one of your snaps. You can experiment with different angles to show off your product’s best side.
3. Try to leave plenty of space around the product to allow for scaling and cropping. Shoot in landscape, not portrait. For most web layouts, landscape photos are going to be much easier to work with than photos taken in portrait. (Because it’s easier to crop a landscape image down to a portrait than to add space around the sides.)
4. Steady hand. Make sure you check each and every shot for blurriness by zooming in. Sometimes, what looks clear in the preview is actually a little unsteady when you get close up.
5. Macro for super close up. Turn on your macro lens to shoot close up. This is a great idea to focus on certain features or for smaller items.
1. Lighten darker images. Have a little play with contrast and brightness. Make sure your colours are bright so they draw in the eye.
2. With the popularity of apps like Instagram, it’s tempting to play with photo filters. When it comes to professional product photos, use them at your own discretion. It’s more important that customers get a clear and crisp image of your product than moody, retro effects.
3. Resize and crop. It’s a good idea to crop and scale your photos to some of the most common web dimensions. Here are some common sizes you’re likely to see.
Square. 60 x 60 | 128 x 128 | 300 x 300
Portrait. 128 x 160 | 240 x 320 | 320 x 480
Landscape. 640 x 360 | 640 x 480 | 800 x 480 (full screen)
Remember that your exact image dimensions will depend on your website design and template, but it’s useful to have a few resized ones in your image bank, just in case.
For someone starting up in ecommerce – this doesn’t mean you have to spend thousands of dollars on a professional photographer or costly equipment. You’d be amazed at what you can do with a simple (and outdated) smartphone camera!

Embed this infographic on your website - copy and paste the code below:
Here are some of our tips for snapping your product shots.
*A note on using Supplier photos. Most manufacturers and suppliers will have product shots available for you to use for your ecommerce store. One thing to keep in mind is that these shots will often be used by multiple sites across the web. If you want your images to stand out amongst the riff-raff, it’s worth considering your own photo shoot.*
Setting up your shoot
1. Head outside! Good lighting is really the key to good photos and unless you’re working with pro lighting equipment or your products are small enough to shoot with a desk lamp, outdoor lighting is going to be your best bet. Quick and dirty tip: choose a slightly overcast day over a bright sunny day for your photo shoot, it will reduce glare while still giving you strong ambient light.Taking the photos
1. Choose a plain background to shoot against so your product is front and centre.2. Get on the level. The temptation is to just take the photo while standing but this probably not the best angle for your photos. So make sure you’re as eye level as possible with your product for at least one of your snaps. You can experiment with different angles to show off your product’s best side.
3. Try to leave plenty of space around the product to allow for scaling and cropping. Shoot in landscape, not portrait. For most web layouts, landscape photos are going to be much easier to work with than photos taken in portrait. (Because it’s easier to crop a landscape image down to a portrait than to add space around the sides.)
4. Steady hand. Make sure you check each and every shot for blurriness by zooming in. Sometimes, what looks clear in the preview is actually a little unsteady when you get close up.
5. Macro for super close up. Turn on your macro lens to shoot close up. This is a great idea to focus on certain features or for smaller items.
Photo Editing (no you don’t have to use Photoshop!)
While it’s certainly a handy program to have, there’s plenty of editing you can do with a basic program like Microsoft Picture Manager or even a smart phone app. Here are some things to look for:1. Lighten darker images. Have a little play with contrast and brightness. Make sure your colours are bright so they draw in the eye.
2. With the popularity of apps like Instagram, it’s tempting to play with photo filters. When it comes to professional product photos, use them at your own discretion. It’s more important that customers get a clear and crisp image of your product than moody, retro effects.
3. Resize and crop. It’s a good idea to crop and scale your photos to some of the most common web dimensions. Here are some common sizes you’re likely to see.
Square. 60 x 60 | 128 x 128 | 300 x 300
Portrait. 128 x 160 | 240 x 320 | 320 x 480
Landscape. 640 x 360 | 640 x 480 | 800 x 480 (full screen)
Remember that your exact image dimensions will depend on your website design and template, but it’s useful to have a few resized ones in your image bank, just in case.


Comment(s)0