New Feature: Conditional Emails (And How To Use Them)
 (Image Source)
Today we’re launching a powerful new feature called ‘Conditional Emails’.
Unlike newsletters, conditional emails are triggered when a customer does a specific action.
Stop and think about the possibilities for a moment.
What if you could send an email to a customer whenever they abandon their basket before completing a purchase? That's an easy way to improve conversions and sales.
Let’s create an Abandoned Basket email right now.
Step 1.
Go to Marketing > Newsletter Management and click on ‘Conditional Emails’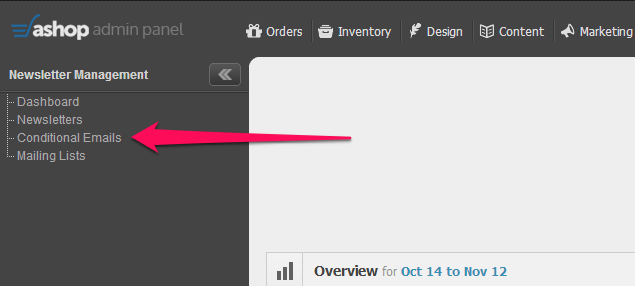
Step 2.
Set the Campaign Title, ‘From’ Name, Reply Email and condition. In this case, I’ve set the email to trigger 1 day after the basket is abandoned. You could set it to 12 minutes or 12 months if you really want to, but 1 day after abandonment feels about right.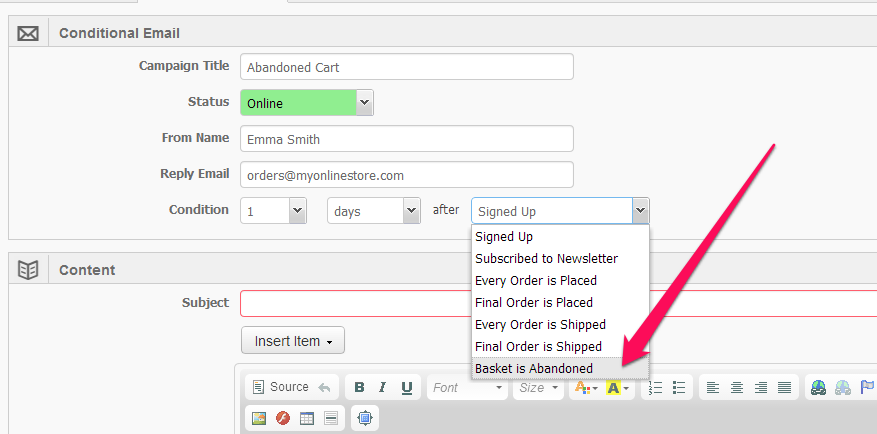
Step 3.
Write the subject and text of your email. You can add variables (text that is personalized to each email recipient) by clicking the Insert Item button. A handy one to use all the time is [NAME]. This way your email will say “Hey Bob” or “Hey Michelle” instead of “Dear valued customer”.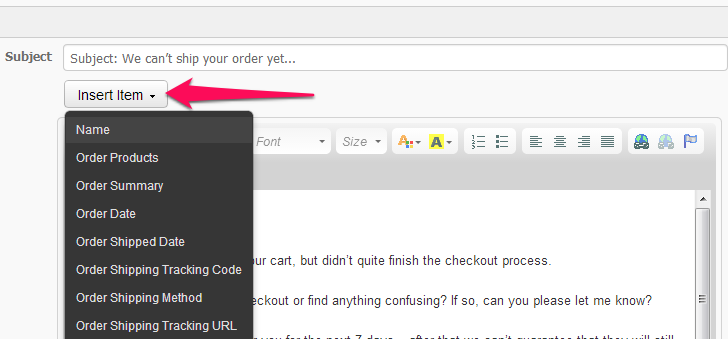
Step 4.
Add a link to your basket page in the email. The whole point of this email is to get a customer to come back and finish off their order, right?The URL you want to use is http://www.yourwebsite.com/Basket
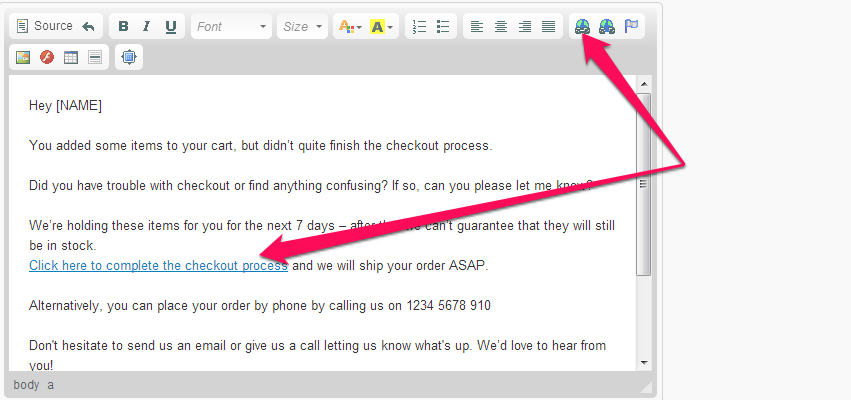
Step 5.
It’s usually a good idea to add your phone number so they can contact you with any questions. Also, consider putting a time limit or other gentle nudge in there to encourage the customer to take action immediately.For example “We’re holding these items for you for the next 7 days – after that we can’t guarantee that they will still be in stock.”
Or maybe “Our sale ends tomorrow. If you want to take advantage of our discounted prices, make sure you complete your purchases by midnight tonight.”
Step 6.
Send a test email to yourself by clicking the “Send Test Email” button. Once you’re happy with the email, make sure the status is set to “Online” and click “Save”.There you go, you now have an Abandoned Cart conditional email.
Some other ideas you could use conditional emails for:
- Post-Purchase Feedback -> trigger an email 3 days after Every order is shipped, with a link to a survey (like Google Forms, Wufoo or SurveyMonkey)
- Re-activation of cold customer -> trigger an email 90 days after Final order is placed with a special offer or discount
- “How to use our product” email drip -> trigger emails 1, 2 & 3 days after Subscribed to Newsletter


Comment(s)4
Click on "Source" in the email text editor and put some HTML/CSS in there.
If you don't know how to create a button in HTML/CSS, try using a tool like this and copy/paste the code into your email.
http://onlinehtmltools.com/button-genaretor/